OBIA 11.1.1.8.1: Mapping GL Accounts to Group Account Numbers

Group Account Number Configuration is an important step in the configuration of Financial Analytics, as it determines the accuracy of the majority of metrics in the General Ledger and Profitability module. Group Accounts in combination with Financial Statement Item Codes are also leveraged in the GL reconciliation process, to ensure that subledger data reconciles with GL journal entries. This topic is discussed in more detail later in this section.
You can categorize your General Ledger accounts into specific group account numbers. The GROUP_ACCT_NUM field denotes the nature of the General Ledger accounts.
Note:
The configuration file or files for this task are provided on installation of Oracle BI Applications at one of the following locations:
Source-independent files: <Oracle Home for BI>\biapps\etl\data_files\src_files\.
Source-specific files: <Oracle Home for BI>\biapps\etl\data_files\src_files\<source adaptor>.
Your system administrator will have copied these files to another location and configured ODI connections to read from this location. Work with your system administrator to obtain the files. When configuration is complete, your system administrator will need to copy the configured files to the location from which ODI reads these files.
  • file_group_acct_codes_jde.csv - this file maps General Ledger accounts to group account codes.
The associations in this file are used in conjunction with the values defined for the following Domains:
  • W_GL_GROUP_ACCOUNT
  • W_GL_ACCT_CATEGORY
  • W_FIN_STMT
These Domain values and the mappings between them classify accounts into sub-groups, like Revenue and Cost of Goods Sold, as well as dividing accounts between Balance Sheet and Profit and Loss. Before you load your data, you must ensure that the account values are mapped consistently across these three collections. In particular, the GROUP_ACCOUNT_NUM domain that is specified in Oracle BI Applications Configuration Manager must contain valid members of the W_GL_GROUP_ACCOUNT Domain. Those values, in turn, are mapped to members of the W_GL_ACCT_CATEGORY and W_FIN_STMT Domains.
You can categorize the General Ledger accounts in Oracle's JD Edwards EnterpriseOne into specific group account numbers. The group account number is used during data extraction as well as front-end reporting.
The GROUP_ACCT_NUM field in the GL Account dimension table W_GL_ACCOUNT_D denotes the nature of the General Ledger accounts (for example, Cash account, AR account, Long Term Debt account Payroll account). For a list of the Group Account Number domain values, see Oracle Business Analytics Warehouse Data Model Reference.
The mappings to General Ledger Accounts Numbers are important for both Profitability analysis and General Ledger analysis (for example, Balance Sheets).
Using the file_group_account_codes_jde.csv, you can specify which group account (among the available group accounts) the object account is associated with. The Company column in this CSV file is the actual company the object account belongs to.
In addition to the From Account and To Account range, the system uses the incoming company as a parameter for the association. If the incoming company has not been configured in the group account flat file, the system inserts 00000 as the default value for Company for lookups. You can choose to not configure group accounts for any company other than 00000 if you are using a single global chart of accounts. However, if you configure group accounts for additional companies, you must configure all possible From Account and To Account ranges for these companies. In addition, you must always configure the entire range of accounts for company 00000.
Table B-20 below shows example values specified in the file file_group_account_codes_jde.csv
Table B-20 Example of file_group_account_codes_jde.csv
COMPANY FROM ACCT TO ACCT GROUP_ACCT_NUM
00000
4100
4190
AP
00000
1200
1299
AR
00000
2120
2195
ACC DEPCN
00000
4200
4211
ACC LIAB
00000
1100
1121
CASH
00000
4900
4910
CMMN STOCK
00000
1401
1469
FG INV
00000
3990
3990
GOODWILL
00000
4690
4690
LT DEBT
00000
3900
3940
OTHER ASSET
00000
1310
1400
OTHER CA
00000
4212
4550
OTHER CL
00000
4950
4950
OTHER EQUITY
00000
4610
4685
OTHER LIAB
The Domain mapping from W_GL_GROUP_ACCOUNT to W_FIN_STMT specifies the relationship between a group account number and a Financial Statement Item code.
Table B-21 shows the Financial Statement Item codes to which Group Account Numbers must map, and their associated base fact tables.
Table B-21 Financial Statement Item Codes and Associated Base Fact Tables
Financial Statement Item Codes Base Fact Tables
AP
AP base fact (W_AP_XACT_F)
AR
AR base fact (W_AR_XACT_F)
COGS
Cost of Goods Sold base fact (W_GL_COGS_F)
REVENUE
Revenue base fact (W_GL_REVN_F)
OTHERS
GL Journal base fact (W_GL_OTHER_F)
By mapping your GL accounts against the group account numbers and then associating the group account number to a Financial Statement Item code, you have indirectly associated the GL account numbers to Financial Statement Item codes as well.

Add a New Metric in the Logical Table Fact – Fins – GL Journals Posted

If you add new Group Account Numbers to the file_group_acct_codes_<source system type>.csv file, then you must also use Oracle BI EE Administration Tool to add metrics to the Oracle BI repository to expose the new Group Account Numbers, as described in this section.
This task is applicable to the following tasks:
This example assumes that you have a new Group Account Number named Payroll (Domain member code 'PAYROLL'), and you want to add a new metric to the Presentation layer called 'Payroll Expense'.
To add a new metric in the logical table Fact – Fins – GL Other Posted Transaction:
  1. Using Oracle BI EE Administration Tool, edit the BI metadata repository (that is, the RPD file).
    For example, the file OracleBIAnalyticsApps.rpd is located at:
    ORACLE_INSTANCE\bifoundation\OracleBIServerComponent\coreapplication_
    obis<n>\repository
    
  2. In the Business Model and Mapping layer:
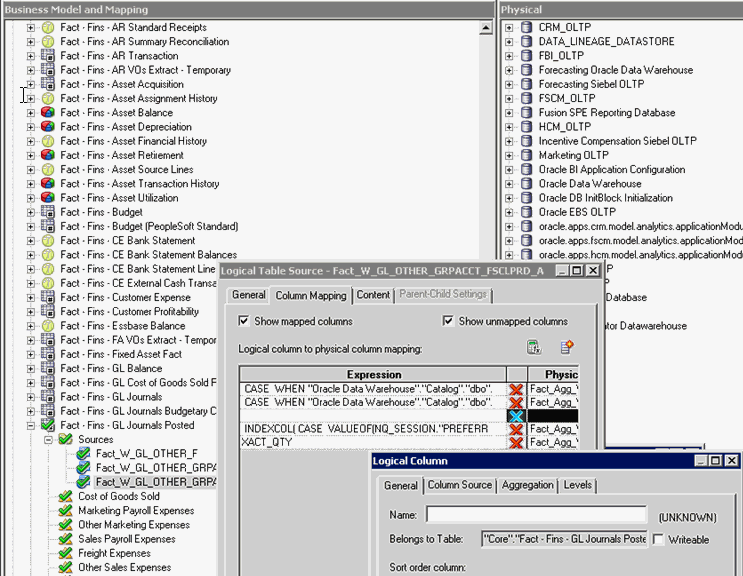
    1. Expand the Core\Fact - Fins - GL Journals Posted\Sources\ folder and double click the Fact_W_GL_OTHER_GRPACCT_FSCLPRD_A source to display the Logical Table Source dialog.
    2. Display the Column Mapping tab.
    3. Click the 'Add New Column' icon to display the Logical Column dialog.
      This screenshot is described in surrounding text.
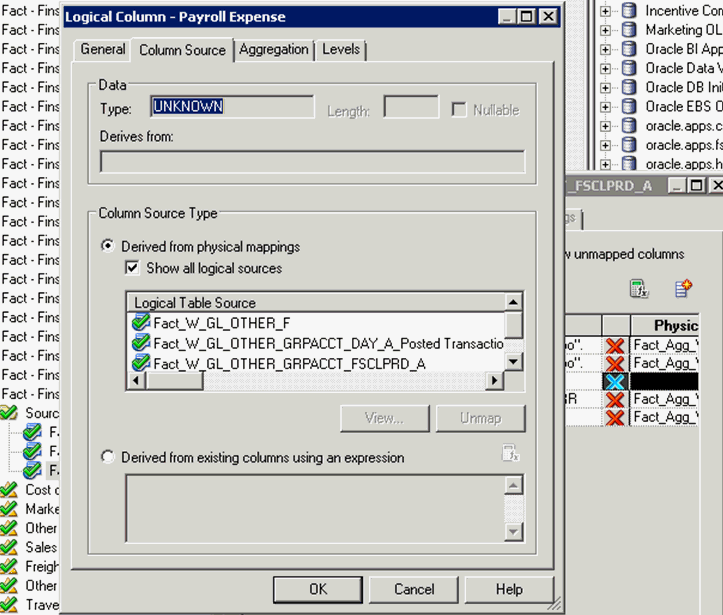
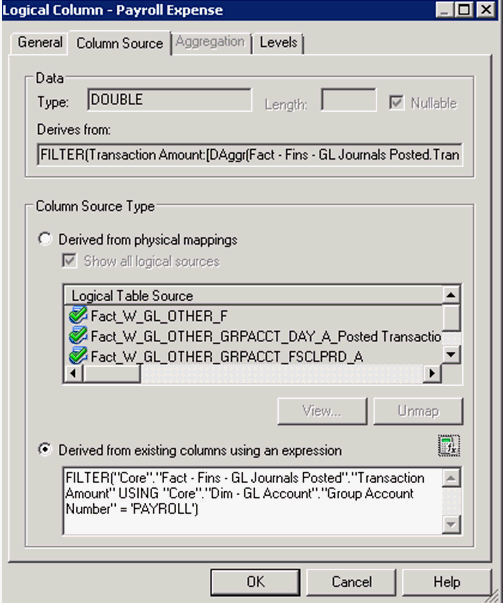
    4. Display the Column Source tab.
      This screenshot is described in surrounding text.
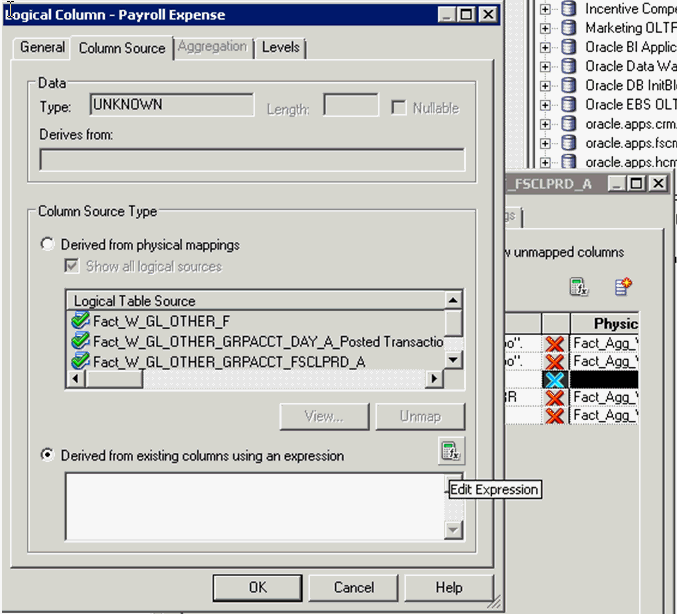
    5. Select the Derived from existing columns using an expression radio button, then click the 'Edit Expression' icon.
      This screenshot is described in surrounding text.
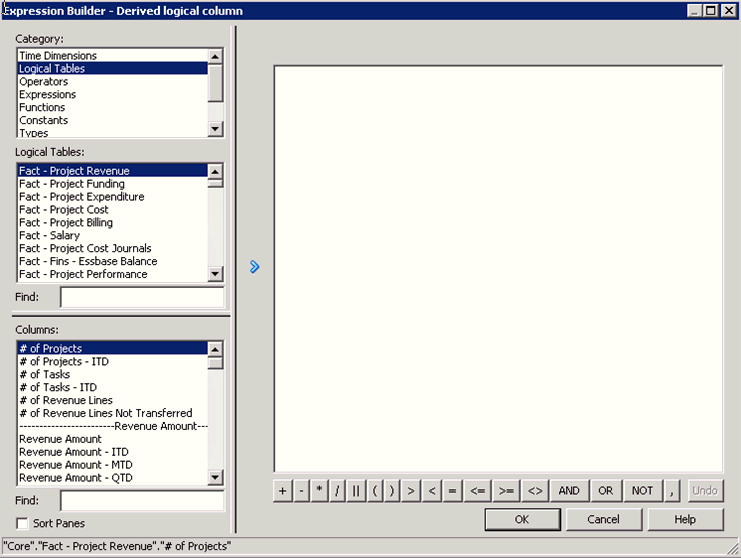
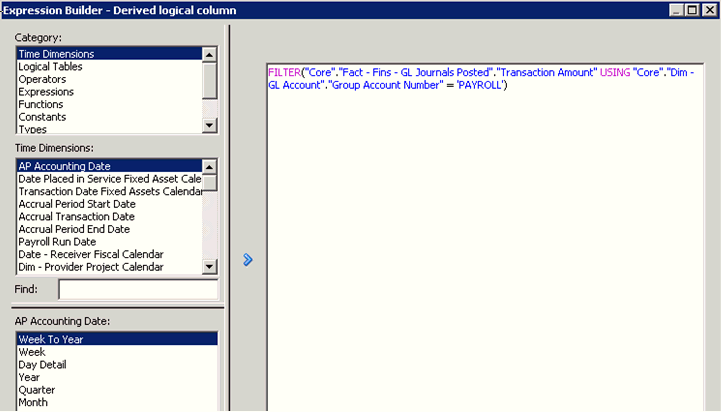
    6. In the Expression Builder, select 'Logical Tables' in the Category list.
      This screenshot is described in surrounding text.
    7. Use the Expression Builder to specify the following SQL statement:
      FILTER("Core"."Fact - Fins - GL Journals Posted"."Transaction Amount"
      USING "Core"."Dim - GL Account"."Group Account Number" = 'PAYROLL')
      
      This screenshot is described in surrounding text.
    8. Click OK to return to the Logical Column dialog.
      This screenshot is described in surrounding text.
  3. Click OK to save the details.
  4. To expose the new repository objects in end users' dashboards and reports, drag the new objects from the Business Model and Mapping layer to an appropriate folder in the Presentation layer.
To add a new metric in the logical table Fact – Fins – GL Balance:
  1. Using Oracle BI EE Administration Tool, edit the BI metadata repository (that is, the RPD file).
    For example, the file OracleBIAnalyticsApps.rpd is located at:
    ORACLE_INSTANCE\bifoundation\OracleBIServerComponent\coreapplication_
    obis<n>\repository
    
  2. In the Business Model and Mapping layer:
    1. Create a logical column named 'Payroll Expense' in logical table 'Fact – Fins – GL Balance'.
      For example, right-click the Core\Fact – Fins – GL Balance object and choose New Object, then Logical Column, to display the Logical Column dialog. Specify Payroll Expense in the Name field.
    2. In the Column Source tab, select the Derived from existing columns using an expression radio button.
    3. Click the Expression Builder icon to display Expression Builder.
    4. Use the Expression Builder to specify the following SQL statement:
      FILTER("Core"."Fact - Fins - GL Balance"."Activity Amount" USING "Core"."Dim - GL Account"."Group Account Number" = 'PAYROLL')
      
      The filter condition refers to the new Group Account Number 'PAYROLL'.
  3. Save the details.
  4. To expose the new repository objects in end users' dashboards and reports, drag the new objects from the Business Model and Mapping layer to an appropriate folder in the Presentation layer.

Map Oracle GL Account Numbers to Group Account Numbers

This section explains how to map Oracle General Ledger Account Numbers to Group Account Numbers.
Note:
If you add new Group Account Numbers to the file_group_acct_codes_<source system type>.csv file, you must also add metrics to the BI metadata repository (that is, the RPD file).
To map Oracle GL account numbers to group account numbers:
  1. Edit the file_group_acct_codes_ora.csv file.
    Note:
    The configuration file or files for this task are provided on installation of Oracle BI Applications at one of the following locations:
    Source-independent files: <Oracle Home for BI>\biapps\etl\data_files\src_files\.
    Source-specific files: <Oracle Home for BI>\biapps\etl\data_files\src_files\<source adaptor>.
    Your system administrator will have copied these files to another location and configured ODI connections to read from this location. Work with your system administrator to obtain the files. When configuration is complete, your system administrator will need to copy the configured files to the location from which ODI reads these files.
  2. For each Oracle GL account number that you want to map, create a new row in the file containing the following fields:
    Field Name Description
    CHART OF ACCOUNTS ID
    The ID of the GL chart of account.
    FROM ACCT
    The lower limit of the natural account range. This is based on the natural account segment of your GL accounts.
    TO ACCT
    The higher limit of the natural account range. This is based on the natural account segment of your GL accounts.
    GROUP_ACCT_NUM
    This field denotes the group account number of the Oracle General Ledger account, as specified in the warehouse domain Group Account in Oracle BI Applications Configuration Manager. For example, 'AP' for Accounts Payables, 'CASH' for cash account, 'GEN PAYROLL' for payroll account, and so on.
    For example:
    101, 1110, 1110, CASH
    101, 1210, 1210, AR
    101, 1220, 1220, AR
    
    Note:
    You can optionally remove the unused rows from the CSV file.
  3. Ensure that the values that you specify in the file_group_acct_codes_ora.csv file are consistent with the values that are specified in Oracle BI Applications Configuration Manager for Group Accounts.
  4. Save and close the CSV file.

Overview of Mapping Oracle GL Accounts to Group Account Numbers

Group Account Number Configuration is an important step in the configuration of Financial Analytics, because it determines the accuracy of the majority of metrics in the General Ledger and Profitability module. Group Accounts in combination with Financial Statement Item Codes are also leveraged in the GL reconciliation process, to ensure that subledger data reconciles with GL journal entries. This topic is discussed in more detail later in this section.
You set up General Ledger accounts using the following configuration file:
  • file_group_acct_codes_ora.csv - this file maps General Ledger accounts to group account codes.
Note:
The configuration file or files for this task are provided on installation of Oracle BI Applications at one of the following locations:
Source-independent files: <Oracle Home for BI>\biapps\etl\data_files\src_files\.
Source-specific files: <Oracle Home for BI>\biapps\etl\data_files\src_files\<source adaptor>.
Your system administrator will have copied these files to another location and configured ODI connections to read from this location. Work with your system administrator to obtain the files. When configuration is complete, your system administrator will need to copy the configured files to the location from which ODI reads these files.
You can categorize your Oracle General Ledger accounts into specific group account numbers. The group account number is used during data extraction as well as front-end reporting. The GROUP_ACCT_NUM field in the GL Account dimension table W_GL_ACCOUNT_D denotes the nature of the General Ledger accounts (for example, cash account, payroll account). For a list of the Group Account Number domain values, see Oracle Business Analytics Warehouse Data Model Reference. The mappings to General Ledger Accounts Numbers are important for both Profitability analysis and General Ledger analysis (for example, Balance Sheets, Profit and Loss, Cash Flow statements).
The logic for assigning the group accounts is located in the file_group_acct_codes_ora.csv file. Table B-3 shows an example configuration of the file_group_acct_codes_ora.csv file.
Table B-3 Example Configuration of file_group_acct_codes_ora.csv File
CHART OF ACCOUNTS ID FROM ACCT TO ACCT GROUP_ACCT_NUM
1
101010
101099
CA
1
131010
131939
FG INV
1
152121
152401
RM INV
1
171101
171901
WIP INV
1
173001
173001
PPE
1
240100
240120
ACC DEPCN
1
261000
261100
INT EXP
1
181011
181918
CASH
1
251100
251120
ST BORR
In Table B-3, in the first row, all accounts within the account number range from 101010 to 101099 that have a Chart of Account (COA) ID equal to 1 are assigned to Current Asset (that is, CA). Each row maps all accounts within the specified account number range and within the given chart of account ID.
If you need to create a new group of account numbers, you can create new rows in Oracle BI Applications Configuration Manager. You can then assign GL accounts to the new group of account numbers in the file_group_acct_codes_ora.csv file.
You must also add a new row in Oracle BI Applications Configuration Manager to map Financial Statement Item codes to the respective Base Table Facts. Table B-4 shows the Financial Statement Item codes to which Group Account Numbers must map, and their associated base fact tables.
Table B-4 Financial Statement Item Codes and Associated Base Fact Tables
Financial Statement Item Codes Base Fact Tables
AP
AP base fact (W_AP_XACT_F)
AR
AR base fact (W_AR_XACT_F)
COGS
Cost of Goods Sold base fact (W_GL_COGS_F)
REVENUE
Revenue base fact (W_GL_REVN_F)
TAX
Tax base fact (W_TAX_XACT_F)Foot 1 
OTHERS
GL Journal base fact (W_GL_OTHER_F)
Footnote 1 E-Business Suite adapters for Financial Analytics do not support the Tax base fact (W_TAX_XACT_F).
By mapping your GL accounts against the group account numbers and then associating the group account number to a Financial Statement Item code, you have indirectly associated the GL account numbers to Financial Statement Item codes as well. This association is important to perform GL reconciliation and to ensure the subledger data reconciles with GL journal entries. It is possible that after an invoice has been transferred to GL, a GL user might adjust that invoice in GL. In this scenario, it is important to ensure that the adjustment amount is reflected in the subledger base fact as well as balance tables. To determine such subledger transactions in GL, the reconciliation process uses Financial Statement Item codes.
Financial Statement Item codes are internal codes used by the ETL process to process the GL journal records during the GL reconciliation process against the subledgers. When the ETL process reconciles a GL journal record, it looks at the Financial Statement Item code associated with the GL account that the journal is charging against, and then uses the value of the Financial Statement item code to decide which base fact the GL journal should reconcile against. For example, when processing a GL journal that charges to a GL account which is associate to 'AP' Financial Statement Item code, then the ETL process will try to go against AP base fact table (W_AP_XACT_F), and try to locate the corresponding matching AP accounting entry. If that GL account is associated with the 'REVENUE' Financial Statement Item code, then the ETL program will try to go against the Revenue base fact table (W_GL_REVN_F), and try to locate the corresponding matching Revenue accounting entry.

Add Dates to the Order Cycle Time Table for Post-Load Processing

To add more dates, you need to understand how the Order Cycle Times table is populated. Therefore, if you want to change the dates loaded into the Order Cycle Time table (W_SALES_CYCLE_LINE_F), then you have to modify the interfaces for both a full load and an incremental load that take the dates from the W_* tables and load them into the Cycle Time table.
To add dates to the Cycle Time table load:
  1. In ODI Designer Navigator, expand Models - Oracle BI Applications - Oracle BI Applications - Fact.
  2. Find W_SALES_CYCLE_LINE_F and add a column to store this date you want to add.
    For example, if you are loading the Validated on Date in the W_SALES_CYCLE_LINE_F table, then you need to create a new column, VALIDATED_ON_DT, and modify the target definition of the W_SALES_CYCLE_LINE_F table.
  3. Save the changes.
  4. Open Projects - BI Apps Project - Mappings - PLP folders.
  5. Find PLP_SalesCycleLinesFact_Load folder and modify interfaces under the folder to select the new column from any of the following source tables, and load it to the W_SALES_CYCLE_LINE_F target table:
    • W_SALES_ORDER_LINE_F
    • W_SALES_INVOICE_LINE_F
    • W_SALES_PICK_LINE_F
    • W_SALES_SCHEDULE_LINE_F
  6. Modify the temp interfaces and the main interfaces for both a full load and an incremental load.

Make Corrections to the Group Account Number Configuration for PeopleSoft

Note: Refer to 'How to set up Group Account Numbers for Peoplesoft' for general concepts about group account number and Financial Statement Item code.
When a user maps a GL natural account to an incorrect group account number, incorrect accounting entries might be inserted into the fact table. For example, the natural account 620000 is mistakenly classified under 'AR' group account number when it should be classified under 'AP' group account number. When this happens, the ETL program will try to reconcile all GL journals charged to account 620000 against sub ledger accounting records in AR Fact (W_AR_XACT_F). Since these GL journal lines did not come from AR, the ETL program will not be able to find the corresponding sub ledger accounting records for these GL journal lines. In this case, the ETL program will insert 'Manual' records into the AR fact table because it thinks that these GL journal lines are 'Manual' journal entries created directly in the GL system charging to the AR accounts.
To make corrections to group account number configurations for Peoplesoft, correct the mapping of GL natural account to the correct group account in the input CSV file called file_group_acct_codes_psft.csv.
If you add values, then you also need to update the BI metadata repository (that is, the RPD file).
Note:
The configuration file or files for this task are provided on installation of Oracle BI Applications at one of the following locations:
Source-independent files: <Oracle Home for BI>\biapps\etl\data_files\src_files\.
Source-specific files: <Oracle Home for BI>\biapps\etl\data_files\src_files\<source adaptor>.
Your system administrator will have copied these files to another location and configured ODI connections to read from this location. Work with your system administrator to obtain the files. When configuration is complete, your system administrator will need to copy the configured files to the location from which ODI reads these files.
For example, before correction, a CSV file has the following values (Incorrect Group Account Number assignment):
  • BUSINESS_UNIT = AUS01
  • FROM ACCT = 620000
  • TO ACCT = 620000
  • GROUP_ACCT_NUM = AR
After correction, account '620000' should now correctly point to 'AP' group account number, and the CSV file would have the following (corrected) values:
  • BUSINESS_UNIT = AUS01
  • FROM ACCT = 620000
  • TO ACCT = 620000
  • GROUP_ACCT_NUM = AP
Based on the Group Account corrections made in the CSV file, the next ETL process would reassign the group accounts correctly and fix the entries that were made to the fact tables from the previous ETL run(s).

Deploy Objects in E-Business Suite for Exploding the Bill Of Materials

The Bill of Materials (BOM) functional area enables you to determine the profit margin of the components that comprise the finished goods. BOM enables you to keep up with the most viable vendors in terms of cost and profit, and to keep your sales organization aware of product delivery status, including shortages.
To deploy objects in E-Business Suite for exploding the BOM, ensure that the E-Business Suite source environment meets the minimum patch level for your version, as follows:
  • Customers with Oracle EBS version R12.2.x must be at or above patch level 17457141:R12.BOM.D.
  • Customers with Oracle EBS version R12.0.x or OPI patch set A must be at or above patch level 16507117:R12.OPI.A.
  • Customers with Oracle EBS version R12.1.x or OPI patch set B must be at or above patch level 16507117:R12.OPI.B.
  • Customers with Oracle EBS version 11i must be at or above patch level 16506948.
Refer to the System Requirements and Supported Platforms for Oracle Business Intelligence Applications for full information about supported patch levels for your source system.
Note: Systems at or above these minimum patch levels include the package OPI_OBIA_BOMPEXPL_WRAPPER_P or OBIA_BOMPEXPL_WRAPPER_P in the APPS schema, and include the following tables in the OPI or BOM schema with alias tables in the APPS schema:
  • OPI_OBIA_W_BOM_HEADER_DS or OBIA_W_BOM_HEADER_DS
  • OPI_OBIA_BOM_EXPLOSION or OBIA_BOM_EXPLOSION
  • OBIA_BOM_EXPLOSION_TEMP
How to Configure the Bill of Materials Explosion Options
The Bill of Materials (BOM) functional area enables you to analyze the components that comprise the finished goods. BOM enables you to determine how many products use a particular component. It also enables you to get visibility into the complete BOM hierarchy for a finished product.
Note: To run the ETL as the apps_read_only user, you must first run the following DCL commands from the APPS schema:
Grant insert on opi.opi_obia_w_bom_header_ds to &read_only_user;
Grant analyze any to &read_only_user;
You can explode the BOM structure with three different options:
  • All. All the BOM components are exploded regardless of their effective date or disable date. To explode a BOM component is to expand the BOM tree structure.
  • Current. The incremental extract logic considers any changed components that are currently effective, any components that are effective after the last extraction date, or any components that are disabled after the last extraction date.
  • Current and Future. All the BOM components that are effective now or in the future are exploded. The disabled components are left out.
    These options are controlled by the EXPLODE_OPTION variable. The EXPLODE_OPTION variable is pre-configured with a value of 2, explode Current BOM structure.
These options are controlled by the EXPLODE_OPTION variable. The EXPLODE_OPTION variable is preconfigured with a value of 2, explode Current BOM structure.
There are five different BOM types in a source system: 1- Model, 2 - Option Class, 3 - Planning, 4 - Standard, and 5 - Product Family. By default, only the Standard BOM type is extracted and exploded. You can control this selection using the EBS_BOM_TYPE parameter.
The SDE_ORA_BOMItemFact_Header mapping invokes the OPI_OBIA_BOMPEXPL_P or OBIA_BOMPEXPL_P package in the EBS database to explode the BOM structure. The Table B-2 lists the variables used to control the stored procedure.
Table B-2 Variables for the BOM Explosion Stored Procedure
Input Variable Preconfigured Value Description
BOM_OR_ENG
1
1—BOM
2—ENG
COMMIT_POINT
5000
Number of records to trigger a Commit.
COMP_CODE
Not applicable.
This parameter is deprecated and no longer affects the functionality of the procedure.
CST_TYPE_ID
0
This parameter is deprecated and no longer affects the functionality of the procedure.
EXPLODE_OPTION
2
1—All
2—Current
3—Current and Future
EXPL_QTY
1
Explosion quantity.
IMPL_FLAG
1
1—Implemented Only
2—Implemented and Non-implemented
LEVELS_TO_EXPLODE
10
Number of levels to explode.
MODULE
2
1—Costing
2—BOM
3—Order Entry
4—ATO
5—WSM
ORDER_BY
1
Controls the order of the records.
1—Operation Sequence Number, Item Number.
2—Item Number, Operation Sequence Number.
PLAN_FACTOR_FLAG
2
1—Yes
2—No
RELEASE_OPTION
0
For RELEASE_OPTION, the possible values are:
0 – include Revised Items with a status of 6 (Implemented)
1 – Include Revised Items with statuses 4, 6, and 7 (Scheduled, Implemented and Released)
2 – Include Revised Items with statuses 1, 4, 6, and 7 (Open, Scheduled, Implemented and Released)
3 – Include items regardless of status.
STD_COMP_FLAG
0
0 – Exclude all components
1 – Explode only standard components
2 – Explode all components
3 – Explode only optional components
NOTE: STD_CMP_FLAG is only used when MODULE = 3 (Order Entry)
UNIT_NUMBER
Not applicable.
When entered, limits the components exploded to the specified Unit.
VERIFY_FLAG
0
This parameter is deprecated and no longer affects the functionality of the procedure.

Review Table Partitioning for Human Resource Analytics

The Human Resource application will benefit from table partitioning especially on larger systems where the amount of data is greater.
The main benefits of table partitioning are:
  • Faster ETL, as indexes are rebuilt only over the table partitions that have changed.
  • Faster reports, as partition pruning is a very efficient way of getting to the required data.
Optional or Mandatory
This task is optional, however by default no tables are partitioned.
Applies to
Systems where Oracle Business Analytics Warehouse is implemented on an Oracle database.
Dependencies
No dependencies.
Task
The latest recommendations for table partitioning of Human Resource tables can be found in Tech Notes in My Oracle Support. These should be reviewed before any action is taken.
There is a table partitioning utility provided in ODI which can be used to create partitioned tables. This utility can be run at any time to implement a particular partition strategy on a table. It is re-runnable and can be used to change the strategy if needed. It will backup the existing table, create the partitioned table in its place and copy in the data and indexes.
For example, to implement table partitioning on the table W_WRKFC_EVT_MONTH_F:
  1. Execute the scenario IMPLEMENT_DW_TABLE_PARTITIONS passing in the parameters as follows:
    Table B-1 Parameters for Table Partitioning
    Parameter Name Description Value
    CREATE_SCRIPT_FILE
    Whether or not to create a file with the partition table script.
    Y(es)
    PARTITION_KEY
    Column acting as partition key.
    EVENT_MONTH_WID
    RUN_DDL
    Whether or not to execute the script.
    N(o)
    SCRIPT_LOCATION
    Location on file system to create the script.
    C:/Scripts/Partitioning
    TABLE_NAME
    Name of table to partition.
    W_WRKFC_EVT_MONTH_F
  2. If required, then review the script and adjust the partitioning definition.
    For the workforce fact table, monthly snapshot records are created from a specified date (HR Workforce Snapshot Date, default value 1st January 2008). Therefore, it would be logical to make this date the cutoff for the first partition, and then partition monthly or quarterly thereafter.
    This is done by changing the script from:
    CREATE TABLE W_WRKFC_EVT_MONTH_F 
    …
    PARTITION BY RANGE (EVENT_MONTH_WID) INTERVAL(1)
     (PARTITION p0 VALUES LESS THAN (1)) 
    …
    
    To:
    CREATE TABLE W_WRKFC_EVT_MONTH_F 
    …
    PARTITION BY RANGE (EVENT_MONTH_WID) INTERVAL(3) 
     (PARTITION p0 VALUES LESS THAN (200801)) 
    …
    
  3. Execute the script against Oracle Business Analytics Warehouse.

Track Multiple Attribute Changes in Bookings

The W_SALES_BOOKING_LINE_F table tracts changes in SALES_QTY, NET_AMT, and certain attributes defined in BOOKING_ID column. BOOKING_ID is calculated in SDE mappings of Sales Order Line table as follows:
  • For SDE_ORA11510_Adaptor and SDE_ORA12Version_Adaptor:
    TO_CHAR(SQ_BCI_SALES_ORDLNS.LINE_ID)||'~'||TO_CHAR(SQ_BCI_SALES_ORDLNS.INVENTORY_ITEM_ID)||'~'||TO_CHAR(SQ_BCI_SALES_ORDLNS.SHIP_FROM_ORG_ID)
    
  • For SDE_FUSION_V1_Adaptor:
    TO_CHAR(SQ_FULFILLLINEPVO.FulfillLineId)||'~'||TO_CHAR(SQ_FULFILLLINEPVO.FulfillLineInventoryItemId)||'~'||TO_CHAR(SQ_FULFILLLINEPVO.FulfillLineFulfillOrgId)
    
However, if you want to track changes on another attribute, then you must concatenate the source column of the attribute with the default mapping expression. For example, if you want to track changes in Customer Account, then concatenate the source column of Customer Account in the BOOKING_ID column as follows:
  • For SDE_ORA11510_Adaptor and SDE_ORA12Version_Adaptor:
    TO_CHAR(SQ_BCI_SALES_ORDLNS.LINE_ID)||'~'||TO_CHAR(SQ_BCI_SALES_ORDLNS.INVENTORY_ITEM_ID)||'~'||TO_CHAR(SQ_BCI_SALES_ORDLNS.SHIP_FROM_ORG_ID)||'~'||TO_CHAR(INP_CUSTOMER_ACCOUNT_ID)
    
  • For SDE_FUSION_V1_Adaptor:
    TO_CHAR(SQ_FULFILLLINEPVO.FulfillLineId)||'~'||TO_CHAR(SQ_FULFILLLINEPVO.FulfillLineInventoryItemId)||'~'||TO_CHAR(SQ_FULFILLLINEPVO.FulfillLineFulfillOrgId)||'~'||TO_CHAR(SQ_FULFILLLINEPVO.HeaderSoldToCustomerId)
    
To track multiple dimensional attribute changes in bookings:
  1. In ODI Designer Navigator, open the SDE_ORA11510_Adaptor, SDE_ORAR12Version _Adaptor, or SDE_FUSION_V1_Adaptor folder.
  2. Open the main interface of SDE mappings of Sales Order Line table:
    • SDE_ORA_SalesOrderLinesFact.W_SALES_ORDER_LINE_FS
    • SDE_FUSION_SalesOrderLinesFact.W_SALES_ORDER_LINE_FS
  3. Find BOOKING_ID column and modify the mapping expression as described above.
    If you want to track changes in multiple attributes, then you must concatenate all source columns of the attributes.
  4. Save your changes to the repository.

Include Non-booked Orders in Order Line and Schedule Line Tables

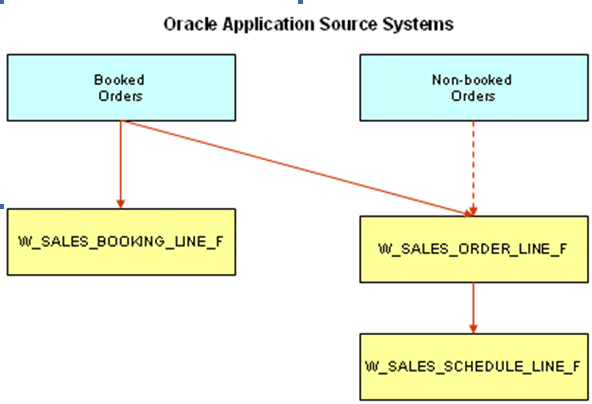
This task applies to E-Business Suite source systems, such as SDE_ORA11510_Adaptor, and SDE_ORAR12Version_Adaptor. By default, only booked orders are extracted from the E-Business Suite, as shown in Figure B-1.
Figure B-1 Handling Booked and Non-booked Orders
This diagram is described in surrounding text.
Therefore, all orders loaded into the Sales Order Lines, Sales Schedule Lines, and Sales Booking Lines tables are booked.
However, you can also load non-booked orders in Sales Order Lines (W_SALES_ORDERS_LINES_F) and Sales Schedule Lines (W_SALES_SCHEDULE_LINE_F), while loading only booked orders in Sales Booking Lines (W_SALES_BOOKING_LINE_F).
If you want to load non-booked orders into the Sales Order Lines and Sales Schedule Lines tables, you have to configure the extract so that it does not filter out non-booked orders. The OE_ORDER_LINES_ALL.BOOKED_FLAG = 'Y' condition indicates that an order is booked; therefore, this statement is used to filter out non-booked orders. So, to load all orders, including non-booked orders, remove the filter condition from the temp interfaces of the following mappings:
  • SDE_ORA_SalesOrderLinesFact
  • SDE_ORA_SalesOrderLinesFact_Primary
Also, if you include non-booked orders in the Sales Order Lines and Sales Schedule Lines tables, you have to exclude non-booked orders when you populate the Sales Booking Lines table from the Sales Order Lines or from the Sales Schedule Lines. You can do this by adding the W_SALES_ORDER_LINE_F.BOOKING_FLG = 'Y' or W_SALES_SCHEDULE_LINE_F.BOOKING_FLG = 'Y' condition to the interfaces of the following mappings:
  • SIL_SalesBookingLinesFact_Load_OrderLine_Credit
  • SIL_SalesBookingLinesFact_Load_OrderLine_Debit
  • SIL_SalesBookingLinesFact_Load_ScheduleLine_Credit
  • SIL_SalesBookingLinesFact_Load_ScheduleLine_Debit
To include non-booked orders in the Sales Order Lines and Sales Schedule Lines tables (for both full and Incremental load):
  1. In ODI Designer Navigator, open the SDE_ORA11510_Adaptor, or SDE_ORAR12Version _Adaptor.
  2. Find SDE_ORA_SalesOrderLinesFact and SDE_ORA_SalesOrderLinesFact_Primary. Then open the temp interfaces below.
    • SDE_ORA_SalesOrderLinesFact.W_SALES_ORDER_LINE_FS_SQ_BCI_SALES_ORDLNS
    • SDE_ORA_SalesOrderLinesFact_Primary.W_SALES_ORDER_LINE_F_PE_SQ_BCI_SALES_ORDLS
  3. Find and delete the filter condition OE_ORDER_LINES_ALL.BOOKED_FLAG='Y' from the temp interfaces mentioned above.
  4. Save your changes to the repository.
    Follow the steps below to make changes for Booking Lines table.
To include only booked orders in the Sales Booking Lines table:
  1. In ODI Designer Navigator, open the SILOS folder.
  2. Open the following interfaces then add the filter to Filters section.
    • SIL_SalesBookingLinesFact_Load_OrderLine_Credit folder: Open Quick-Edit tab of the SIL_SalesBookingLinesFact_Load_OrderLine_Credit.W_SALES_BOOKING_LINE_F_SQ_W_SALES_ORDER_LINE_F interface, and add W_SALES_ORDER_LINE_F.BOOKING_FLG = 'Y' to the Filters section.
    • SIL_SalesBookingLinesFact_Load_OrderLine_Debt folder : Open Quick-Edit tab of the SIL_SalesBookingLinesFact_Load_OrderLine_Debt.W_SALES_BOOKING_LINE_F interface, and add SQ_W_SALES_ORDER_LINE_F.BOOKING_FLG = 'Y' to the Filters section.
    • SIL_SalesBookingLinesFact_Load_ScheduleLine_Credit folder : Open Quick-Edit tab of the SIL_SalesBookingLinesFact_Load_ScheduleLine_Credit.W_SALES_BOOKING_LINE_F_SQ_W_SALES_SCHEDULE_LINE_F interface, and add W_SALES_SCHEDULE_LINE_F.BOOKING_FLG = 'Y' to the Filters section.
    • SIL_SalesBookingLinesFact_Load_ScheduleLine_Debt folder : Open Quick-Edit tab of the SIL_SalesBookingLinesFact_Load_ScheduleLine_Debt.W_SALES_BOOKING_LINE_F interface, and add SQ_W_SALES_SCHEDULE_LINE_F.BOOKING_FLG = 'Y' to the Filters section.
  3. Save your changes to the repository.

OBIA 11.1.1.8.1:Add Closed Orders to Backlog Calculations

  1. By default, the Oracle Supply Chain and Order Management Analytics application only extracts open sales orders from the Sales Order Lines (W_SALES_ORDER_LINE_F) table and Sales Schedule Lines table (W_SALES_SCHEDULE_LINE_F) for backlog calculations to populate the Backlog tables. Open sales orders are defined as orders that are not canceled or not complete. 
  2. The purpose in extracting only open orders is that in most organizations those orders that are closed are no longer a part of backlog. 
  3. However, if you want to extract sales orders that are marked as closed, you must remove the default filter condition from the extract mapping.
  4. For example, assume your customer orders ten items. Six items are invoiced and shipped, but four items are placed on operational and financial backlog. 
  5. This backlog status continues until one of two things happens:
  • The items are eventually shipped and invoiced.
  • The remainder of the order is canceled.
If you choose to extract sales orders that are flagged as closed, you must remove the condition in the Backlog flag. To do so, use the following procedure.
The BACKLOG_FLAG in the W_SALES_ORDER_LINE_F table is also used to identify which sales orders are eligible for backlog calculations. By default, all sales order types have their Backlog flag set to Y. As a result, all sales orders are included in backlog calculations.
To remove open order extract filters:
  1. In Oracle Data Integrator, open Mappings folder, and then SDE_ORA11510_Adaptor, SDE_ORAR12Version_Adaptor
  2. Open SDE_ORA_SalesOrderLinesFact - Interfaces - SDE_ORA_SalesOrderLinesFact.W_SALES_ORDER_LINE_FS for E-Business Suite adaptors
  3. Click Quick-Edit tab and expand Mappings inside Quick-Edit tab.
  4. Find the OPR_BACKLOG_FLG and open Mapping Expression. Then, remove SQ_BCI_SALES_ORDLNS.OPEN_FLAG = 'Y' AND for E-Business Suite adaptors, or remove SQ_FULFILLLINEPVO.FulfillLineOpenFlag = 'Y' AND for FUSION adaptor.
  5. Find the FIN_BACKLOG_FLG and open Mapping Expression. Then, remove SQ_BCI_SALES_ORDLNS.OPEN_FLAG = 'Y' AND for E-Business Suite adaptors, or remove SQ_FULFILLLINEPVO.FulfillLineOpenFlag = 'Y' AND for FUSION adaptor.
  6. Save your changes to the repository.
  7. Open the Mappings folder, and then PLP folder.
  8. Open PLP_SalesBacklogLinesFact_Load_OrderLines - Interfaces -PLP_SalesBacklogLinesFact_Load_OrderLines.W_SALES_BACKLOG_LINE_F.SQ_SALES_ORER_LINES_BACKLOG.
  9. Click Quick-Edit tab and expand Filters inside Quick-Edit tab.
  10. Find the filter W_STATUS_D.W_STATUS_CODE<>'Closed' and remove it.
  11. Open PLP_SalesBacklogLinesFact_Load_ScheduleLines - Interfaces -PLP_SalesBacklogLinesFact_Load_ScheduleLines.W_SALES_BACKLOG_LINE_F.SQ_W_SALES_SCHEDULE_LINE_F.
  12. Click Quick-Edit tab and expand Filters inside Quick-Edit tab.
  13. Find the filter W_STATUS_D.W_STATUS_CODE<>'Closed' and remove it.
  14. Save your changes to the repository.